
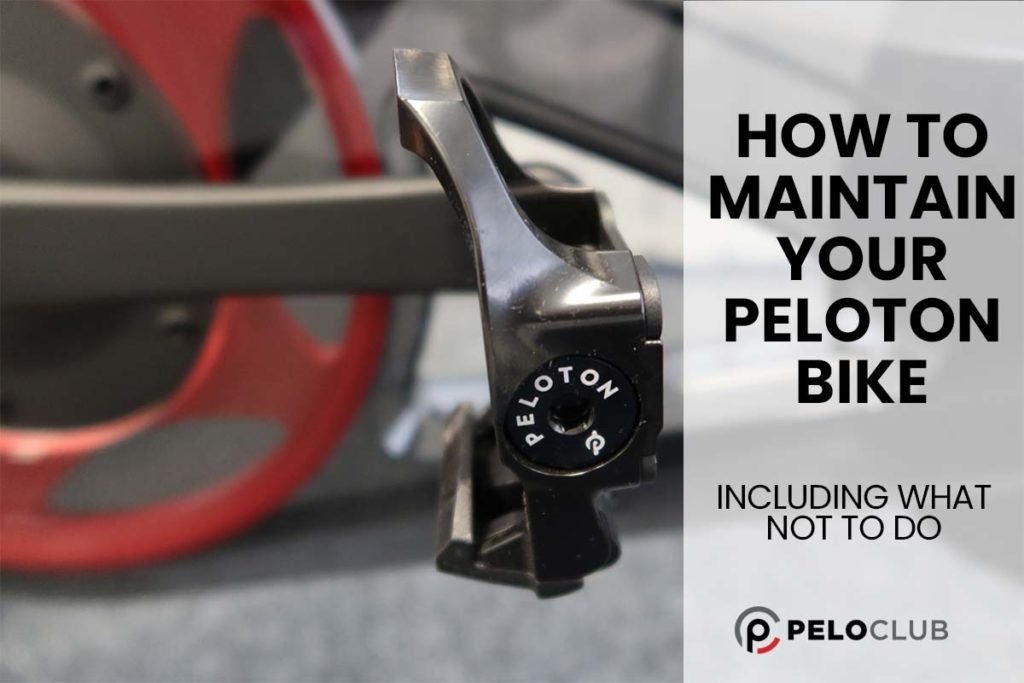
Are you wondering how you can maintain your Peloton Bike or Bike+? Do you want to know the best tips for taking care of your Peloton? Have you recently bought a Peloton and need to understand how to keep it in tip-top condition? Here’s everything you need to know about maintaining a Peloton Bike and Bike+.
To maintain your Peloton Bike or Bike+, ensure the pedals, cleats, and belt are lubricated. Check pedals are tight and change them regularly. Purchasing a Peloton Service Plan will ensure you’re covered if any parts need replacing. Don’t forget to power off your Peloton Bike or Bike+ by unplugging it after riding. It would be best if you recalibrated your Bike regularly too.
Read on to learn more about what you need to do to maintain your Peloton Bike or Bike+.
What should I do to maintain my Peloton Bike (Bike+)?
You need to take a few key steps to keep your Peloton Bike in good shape.
Be careful to follow these steps to keep your Bike well-maintained. Not maintaining the Bike may lead to functionality problems further down the line.
A crucial part of maintaining your Peloton Bike is to keep it clean (link to cleaning article). When you ride, sweat and dirt can get stuck on your Bike.
It’s also important to lubricate your Bike and take care of the pedals between rides.
Purchasing the Peloton Extended Service Plan might help you maintain your Peloton.
How to Lubricate a Peloton Bike (Bike+)
It’s recommended that you use dry spray-on lubricant with Teflon to lubricate your Peloton Bike/Bike+.
Do not attempt to use other types of lubricant on your Peloton Bike. Using different kinds of lubricant, significantly, those containing oil will damage the Bike.
Peloton Bikes don’t need to be lubricated often. However, tension can build up when you’re riding, and over time it can lead to friction and the need for lubrication.
Lubricating the pedals
It’s worth lubricating your Peloton pedals around every three to four months, depending on how much you use your Bike.
To find out if your pedals need lubricating, check your pedals every month or so. If you notice the pedals aren’t spinning around as easily as before, it’s time to lubricate them.
Purchase some spray-on lubricant with Teflon, which should easily be located in your local hardware shop.
To lubricate the pedals themselves, spray a small amount of lubricant at the point where the pedal meets the crank arm.
Spin the pedal around to make sure the lubricant is correctly worked in.
Lubricating when you have squeaky pedals or cleats
A common sign that your Peloton Bike needs lubrication is a squeaking sound coming from your pedals or cleats when you ride.
If the Bike is squeaking, you will need to lubricate your pedals using the method above.
You may also need to spray your cleats. Flip your pedals over so the cleats face upwards and a small amount of lubricant onto your cleats.
This should ease the friction when you’re riding and stop the squeaking.
Lubricating your Peloton belt
Although this is not normally suggested, you might also want to lubricate your Peloton Bike’s belt, located on the right side of the Bike.
To lubricate the belt, first, remove the plastic cover around it. Next, you will need a screwdriver to unscrew this plastic guard.
Next, spray a small amount of lubricant onto the flywheel while turning the pedals with your hand to work the lubricant in.
Ensure you also spray a small amount of lubricant at the belt tension point.
Screw your plastic guard back on before using your Bike again.
How to Maintain your Peloton Bike Pedals
Firstly, remember that Peloton Bike and Bike+ pedals may need to be changed yearly or sooner if you see excessive wear.
Pedals are bound to suffer some general wear and tear damage throughout the year of your riding. This means you should think about replacing them each year, depending on how often the Bike or Bike+ is ridden and how hard too.
To change your pedals, use the 15mm wrench that came with your Peloton to twist the right pedal all the way to the left until the pedal comes off.
Then twist the wrench on the left pedal all the way to the right until the pedal comes off.
The left pedal is reverse threaded, so you need to turn it to the right to loosen and remove it, not the left!
Replace your pedals by twisting them into position and tightening them by using the wrench again.
Note that changing your Peloton pedals will not void your warranty!
Your pedals might become looser as a result of rides. Therefore, it’s recommended that you check your pedals are still tight once a month.
Your pedals are too loose if you try and spin them with your hand, and they turn very rapidly.
To tighten your pedals, firstly, you need to turn your resistance knob all the way to the right. The resistance knob is the bright red knob in the center of your Bike.
Now you’ll be able to adjust the pedal without the wheel spinning. First, position the right pedal so that it is horizontal.
Use your wrench to tighten the right pedal all the way to the right.
Next, position the left pedal so that it’s horizontal and then turn the wrench all the way to the left.
Should I Turn Off My Peloton Bike When I’m Not Riding It?
Yes, you should.
Another essential part of everyday maintenance for your Peloton Bike or Bike+ is powering off when you’re not riding it.
Peloton recommends powering off your device by unplugging it any time you’re not using it.
Also, if you’re trying to limit the amount of power you use as much as possible, the best way to do this is to power off the Bike after usage.
You can power off your Peloton Bike or Bike+ by switching off the power cord at the wall or unplugging the power cord at the wall.
Your Peloton will automatically go into sleep mode after around 25 minutes without using it. However, some users choose to leave their Bike in sleep mode.
However, Peloton does not recommend leaving your Bike in sleep mode for long periods without using it. Instead, it will be better to power the Bike off by unplugging it at the wall.
Another benefit of turning your Peloton Bike off when you’re not riding is that it may fix any minor glitches during usage.
How much does it cost to maintain a Peloton Bike or Bike+?
A certain number of set costs come with maintaining a Peloton Bike.
These costs include the price of changing your pedals each year. A new set of pedals will cost around $50-$150, depending on the type and brand you choose.
It also includes the cost of spray-on lubricant with Teflon, which is around $10 per can.
Other maintenance costs may include replacing the bearings, around $70-$150. You might also need to replace other Bike parts from general wear and tear.
However, if you purchase a Peloton Service Plan, you might be covered for the costs of replacing parts of your Bike.
What does the Peloton Service Plan cover?
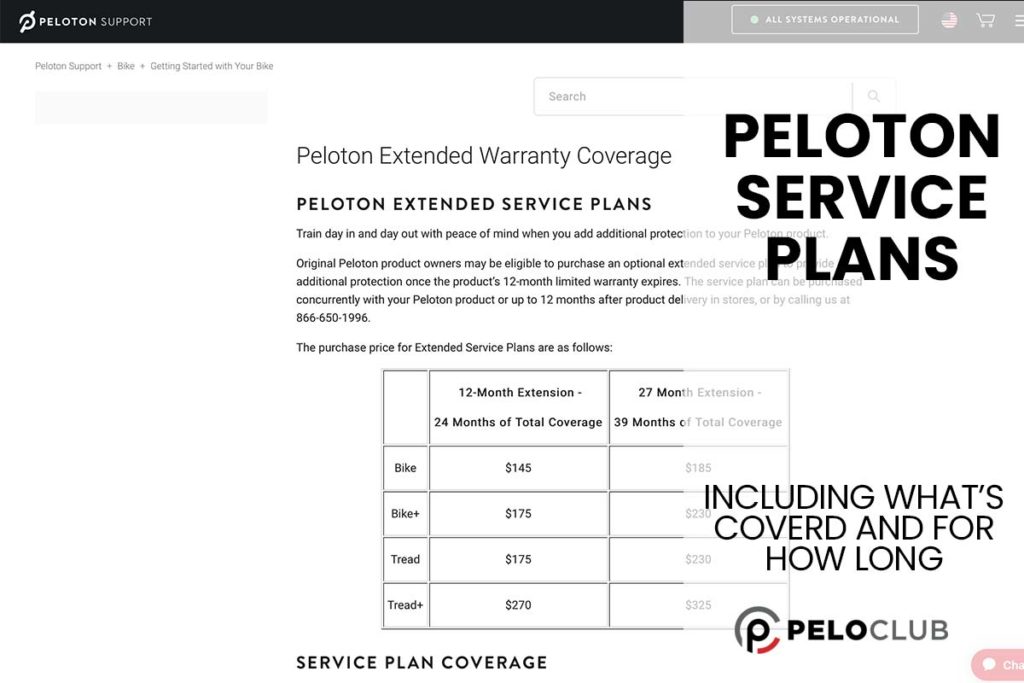
You can buy a Peloton Service Plan when you purchase a Peloton Bike or Bike+ or any time within 12 months from when the Bike is delivered. I did.
The Service Plan is a great way to feel reassured that your Bike or Bike+ will be well-maintained even if you encounter problems.
Once you’ve purchased the Service Plan, it covers any parts needed for repair and the labor costs for this repair.
This includes the cost of any repairs which involve replacing parts of the Peloton Bike that aren’t fixable.
Let’s say, for example, your Peloton Bike’s handles break during the Service Plan coverage period. If this happens, your Service Plan will cover the cost of the replacement handles and the labor itself.
Unlike some other warranties, Peloton’s Service Plan covers any failures caused by normal wear and tear usage. In addition, it covers failures caused by mechanical or electrical breakdowns or power surges.
The only thing that Peloton’s Service Plan does not cover is any cosmetic damage. Unfortunately, this means that if anything purely aesthetic is damaged on your Bike, you’ll have to pay for parts and labor yourself if you want it fixed.
Cosmetic damage includes any dents or scratches or paint damage or rust. These things will not affect the Bike usage, so the Service Plan does not cover them.
What does the Peloton Service Plan cost?
Please check the latest prices in your country, but you can take out a 12 or 27-month extension, meaning you have 24 or 39 months coverage from new.
How to Recalibrate a Peloton Bike
Your Peloton Bike is calibrated when the resistance allows the crank to move in the properly expected way following the specifications of a Peloton Bike.
Calibration relates to the Bike’s resistance. The resistance must be appropriately aligned to enable the crank to move in the correct cycle motion when you’re riding.
Your Peloton Bike won’t need regular recalibration. However, sometimes, you might notice a change in how easy it is to ride your Bike.
This might be because your Bike needs recalibration as the resistance has increased to a level not suitable for you as a rider.
So, you might notice that it’s more challenging to ride suddenly (due to the increased resistance).
Recalibration is more likely to be necessary if, for example, you move your Peloton to a new house.
Your Peloton may lose calibration during the move and need you to reset it.
So, let’s run through the steps to recalibrate your Peloton Bike or Bike+.
Standing at the back of your Bike, look under the seat to remove your water bottle holder and sweat guard. Use the 3mm and 4mm Alan keys that came with your Peloton Bike to do this.
Next, head to your monitor and touch the three lines in the top left corner, then ‘about.’ Tap the right corner of the ‘about’ window about ten to twenty times until the calibration screen appears.
Your Peloton Bike or Bike+ screen will now explain the process of recalibrating.
Turn your resistance knob (the red knob in the middle of your Bike) to the left to loosen your resistance.
When it’s entirely loosened, tap the calibrate option on your touchscreen. Then tap to calibrate maximum resistance.
Turn your resistance knob all the way to the right to tighten the resistance. Click done on your screen.
Now you need to use your calibration tools. These are small white plastic tools that will fit under the Bike’s flywheel and on top of the Bike’s resistance knob.
Loosen the resistance knob, slide your flywheel calibration tool under the flywheel, and tighten the knob again so that the white tool sits securely on top of the wheel. Then remove the calibration tool.
Take your resistance knob calibration tools and place them both under the knob. Line up the tools together and turn the slots towards the bike seat.
Tap next on your monitor to begin the calibration process. Tap set, then turn the knob a quarter to the right. Only the top calibration tool should move as you do this. Repeat this process for the next 30 steps.
Your calibration should now be complete. The final step you need to take is to clear your Peloton’s data and then unplug your Bike.
Replace your water bottle holder and sweat guard using your Alan keys before riding again.
The Peloton B ike+ automatically recalibrates, so you don’t need to do this for this version.
How to Get Spares for a Peloton Bike or Bike+
If you’ve got a piece you need to replace on your Peloton Bike or Bike+; luckily, you should have no trouble finding a replacement or a spare.
There are several different places you can find spares for your Peloton Bike or Bike+.
On https://www.pelotonforum.com/forums/peloton-maintenance-and-replacement-parts.15/ you can find a community of other Peloton users posting about parts they need. So you might have luck finding your Peloton parts here too.
Other useful websites include eBay and www.sportsmith.com, where plenty of Peloton spare or replacement parts are available to buy.
So that’s how to maintain your Peloton Bike and Bike+, so it gives you years of trouble-free riding, and don’t forget to clean it too, as this is a simple way to spot any issues before they become more serious.