
Have you just got a Peloton Bike or Bike+? Are you wondering how you can set up your Peloton Bike or Bike+ properly? For example, do you want to know how to set your Bike seat and handlebars to the correct height? Here’s everything you need to know about setting up your Peloton Bike or Bike+.
To set up your Peloton Bike or Bike+, after the Peloton engineers have done what they need, this is what you need to do: Plug your Peloton power supply into the wall and the insert located on the rear stabilizer. Next, adjust the seat so that your knees have only a slight bend and your toes aren’t pointing down too heavily. Set up your handlebars so that your spine is long and straight, and make sure that you aren’t slouching.
Read on to find out all the different things you need to consider when correctly set up your Peloton Bike or Bike+.
Table of contents:
- Setting up the Peloton Bike (Bike+)
- What weight can the Peloton Bike (Bike+) take?
- What height rider can the Peloton Bike (Bike+) take?
- Seat Height Guide
- Handlebar Height Guide
- Space required for your Peloton Bike or Bike+
- Peloton Bike (Bike+) set up troubleshooting
Setting up the Peloton Bike (Bike+)
It’s bound to be an exciting day when you get your Peloton Bike. This guide will take you through all the steps to start riding.
Firstly, note that it’s going to take about half an hour to an hour to set up your Peloton completely. So make sure you set aside some time.
When your Bike arrives, the Peloton technicians will have done or will do most of the assembly process for you.
And the required floor space for the Bike or Bike+ is 150 cm x 60 cm. Make sure you also have a head height of 244 cm, but for more details, see the article all about the space you need here.
So what you’ll need to focus on is installing your touchscreen, plugging your Bike in, and setting your Bike’s height and handlebars to fit your requirements.
Installing the Peloton screen (Peloton Bike)
You’ll have the option for the Peloton technician to deliver your Peloton Bike or Bike+ with the screen attached.
You can also opt for it to be detached. For example, you might choose to do this if you want to move your Bike to a different room in your house after delivery.
Having a detached screen will make the process of moving your Peloton Bike or Bike+ much safer.
Firstly, to install your Peloton screen, take your touchscreen out of the delivery box and put it face down on a soft surface. Please do not put it directly onto the floor.
You’ll see a square panel located on the back of the touchscreen. Take this panel off, then pick up your touchscreen and place it onto the Peloton monitor mount.
Take your Phillips head screwdriver and four screws (located in the touchscreen delivery box) and secure your touchscreen onto the mount.
Please pick up the square panel and pop it back onto the back of the touchscreen.
Take your monitor cable, located near the Bike’s flywheel, and plug this into the power and data ports. You’ll find these ports on the back of your touchscreen.
Don’t get confused with the Bike’s power cable and monitor cable. The power cable is located on the back base stand of your Bike. Your flywheel finds the monitor cable.
Installing the Peloton screen (Peloton Bike+)
Take your Peloton Bike+ screen out of the delivery box and place it onto the monitor mount at the end of the Bike’s arm.
It should slide in easily. But remember that it’s not secure like this. You need to tighten the monitor bolts using a 4mm Allen wrench.
Tighten the bolts as much as possible to prevent the monitor from becoming misaligned or falling off.
Plug the power and audio cables into the back of the monitor. The wires will be located at the back of the monitor mount.
Plugging in the Peloton Bike or Bike+
Wherever you choose to put your Peloton Bike or Bike+ in the house, it must be close to a power outlet.
All Peloton Bikes need to be plugged into a power outlet to function.
Your Bike will come with a brick power cord. Plug this cord into the port on the center of your Bike’s back base stand.
Plug the other end of the power cord into a power outlet. When you do this, the LED on the cable will turn on.
To turn your Peloton Bike or Bike+ on, press the power button on the back of your Bike’s monitor.
What weight rider can the Peloton Bike (Bike+) take?
Before buying a Peloton Bike, it’s essential to check the weight limit.
Peloton states that the weight limit for the Peloton Bike and Bike+ is 135kg/21 stone, 3lbs.
Unfortunately, the Bike should not be used by people who weigh more than this.
What height rider can the Peloton Bike (Bike+) take?
The Peloton Bike can be used by riders who stand between 4 foot eleven inches to 6 foot 11 inches (150cm – 196cm).
See below how you can adjust the Peloton to suit your requirements depending on your height.
Seat Height Guide
Of course, when your Peloton arrives, it won’t be set up for your specific measurements. Follow the guide below to ensure your seat is the correct height.
It’s essential to set up your Peloton Bike or Bike+ with the correct adjustments for your height. Setting it up incorrectly could lead to back injuries or other physical injuries.
How to set up your Peloton Bike seat
First of all, note that there are two levers to adjust to make your Peloton Bike seat fit.
There’s the height lever, which is located underneath the seat close to the flywheel. There’s also the depth lever, which is located directly below the seat. The depth lever is attached to the seat itself.
To begin adjustments, locate the height lever under your Bike seat and turn it to the left to loosen it.
Once loosened, you’ll be able to lift the seat up or push it down, depending on your height.
To start with, Peloton recommends positioning the seat level with your hip bone.
Stand next to your Bike, facing the monitor, and adjust the seat until it’s level with your hip.
Once it’s in position, tighten the seat again by turning the lever back to the right.
When you tighten the lever, you might find that it’s sticking out a bit. If this happens, don’t worry, you can easily pull out the lever a little bit and align it, so it’s facing down. Then it won’t interrupt your ride.
To adjust the seat depth, you need to loosen your depth lever under the bike seat by turning it to the left.
Peloton recommends setting the seat depth in the middle of the frame if it’s your first time using a Peloton Bike.
Another way to set your seat depth is to use your arm to measure the length between your elbow and the handlebars.
Stand next to your Bike, looking towards the monitor. Then place your elbow on the front of your Bike seat and reach forward toward the handlebars.
If your fingertips touch the edge of the handlebars, your seat depth is set up for you to begin riding!
If your fingers can wrap around the handlebars or if they aren’t touching the handlebars at all, move your seat backward or forwards until your fingertips are touching the handlebars’ edge.
Turn the depth lever back to the right to tighten the seat again.
These depth and height settings are an excellent place to start when you’re beginning to ride your Peloton Bike. However, you might find you need to make other adjustments once you start riding.
Height adjustments for your best ride
The best thing to do next is getting on the Bike and see how it feels. This is when you can become more accurate to your specific measurements on the Bike.
It might be helpful to have a friend or partner help you with this. It’ll be much easier for them to see how your legs look when you’re riding!
Before any adjustments are made, get into your proper riding position. Place your hands on the handlebar and turn the pedals as if you were on a regular ride.
For the best seat position, your knee should have only a slight bend, and your toes should not be heavily pointing down.
When you’re riding, there shouldn’t be a significant bend in your knee. Check to see if your knee is still bent when you push the pedals the whole way down.
If your knee still has a significant bend in it when you’re on a downward pedal stroke, adjust your seat by loosening the height lever and pushing the seat up slightly. Tighten the lever before you get back on.
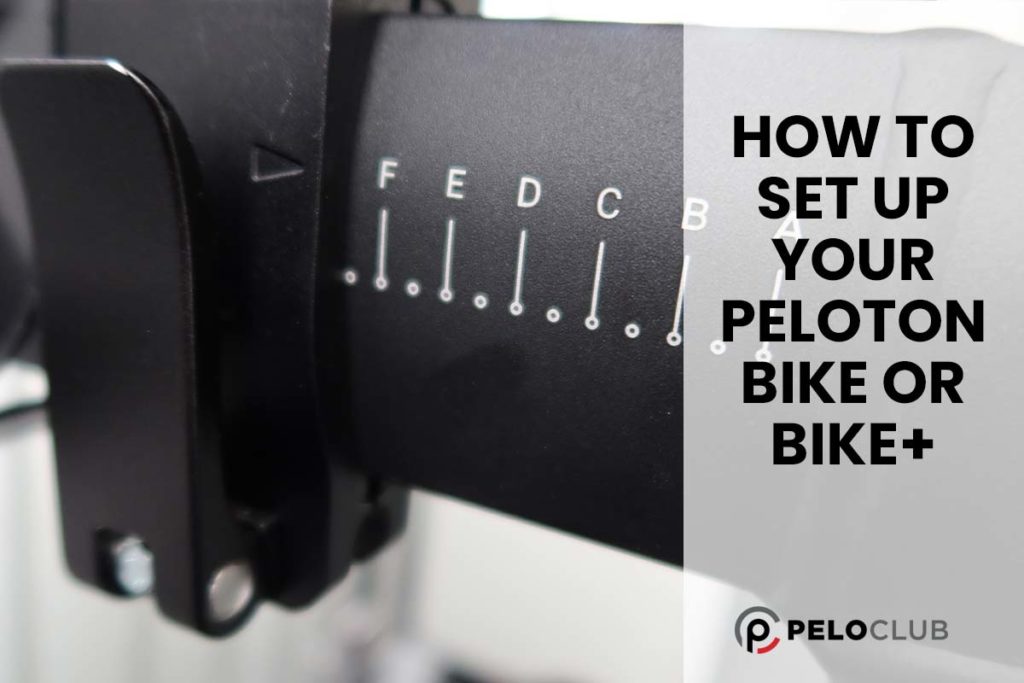
Note that Peloton has a handy ruler on the seat frame. Try and adjust your seat height by around a quarter or half an inch or 1cm or half a centimeter at a time when you’re looking to find the perfect position.
Adjusting by a small amount each time and keeping an eye on your height by using the ruler will help you get the best seat height possible.
Keep testing whether your knee has a significant bend and raise the seat if so. Your saddle is too low if your knees are significantly bent when you’re pedaling down.
Instead of being too low, your seat could also be positioned too high. You can tell if your saddle is set too high by checking if your toes are straining down and your ankles have to push down too hard.
If your toes are dropping down on your downstrokes, this means your seat is too high. You don’t want your ankles and feet to have to overstrain to push down the pedals, as this could lead to injury.
Raise your Bike seat by loosening the height lever to push the saddle down. Then tighten the lever once more.
When you’re riding, you don’t want to be reaching down for the pedals. Instead, you want a seat height that lets you extend your leg but does not force you to over-exert your ankles and feet to push down.
Depth adjustments for your best ride
You’ll probably need your friend or partner to help you with this to get the best results.
To get the most accurate seat depth, someone needs to look at the position of your legs as you’re turning the pedals.
Start by riding your Bike normally, and stop when your foot is in the 3 o’clock position. The crank arm of the pedal must be level with the floor for accuracy here. Hold your foot in this position.
You want your knee to be accurately aligned with the ball of your foot. If your knee is in front of the ball of your foot, use the depth lever to move your seat back.
If your knee is behind the ball of your foot, use the depth lever to move the seat backward.
As with the seat height, only make minor adjustments each time and see how these go. Use the ruler under the seat to determine how much you’re adjusting the seat each time. Again, try and only modify by about 1cm or half a centimeter at a time.
It’s also worth looking at alternative saddles as there are better quality versions from third-party companies that may be better for you. I personally like the ISM range as it’s, let’s just say, “more male-friendly”.
Handlebar Height Guide
When your Peloton Bike or Bike+ arrives, you may also need to adjust the handlebar height so that they fit you.
To set up your handlebars properly, follow the guidance below.
How to set up your handlebars
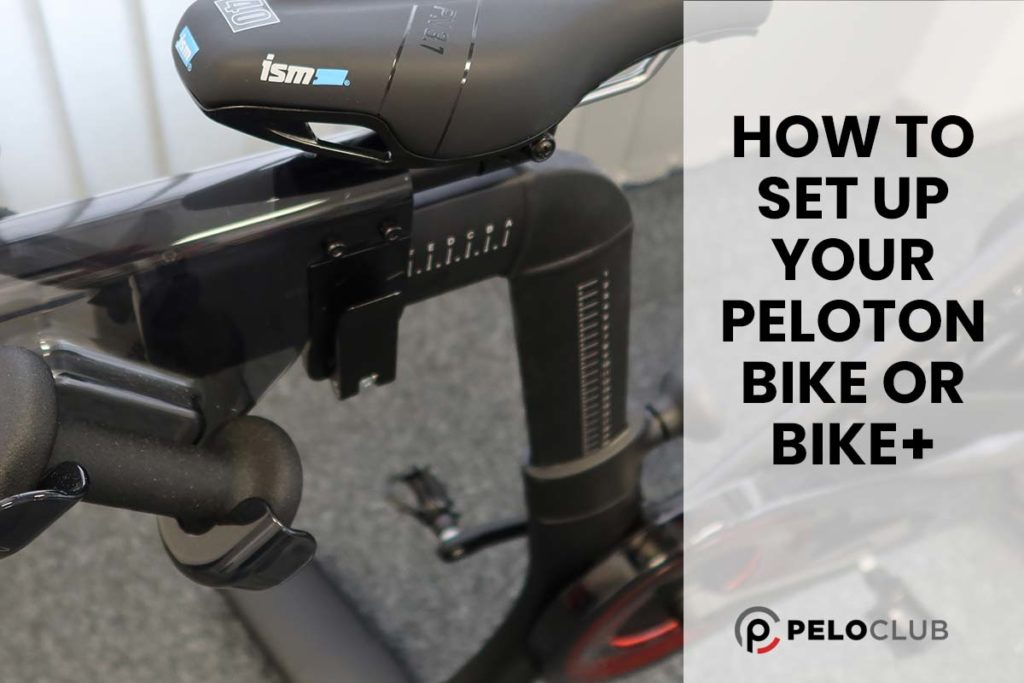
Firstly, to set your handlebars up, locate the lever at the front of your Bike underneath the handlebars and monitor.
Turn this lever to the left to loosen it. Then, gently lift the handlebars using your forearms while facing your handlebars and monitor.
Tighten the lever again by turning it all the way to the right. Make sure the lever isn’t loose. Your monitor screen is attached to the handlebars, so you don’t want to cause any damage by having a loose lever here.
Peloton recommends setting the handlebars at the maximum height possible when you’re starting as a rider.
You can then gently lower the handlebars depending on how it feels when you ride.
Height adjustments for your best ride
Adjustments for your handlebars are slightly different from your Peloton Bike or Bike+ seat adjustments.
This is because while it is crucial to get the position of your legs right when you’re riding to avoid leg injuries, there is some more flexibility in choosing your handlebar settings.
The best position for your handlebars is when you feel you have enough extension in your spine while not putting too much pressure on your shoulders to reach forward.
Get onto your Bike and start pedaling. Firstly, see how it feels.
If you feel like your shoulders are slouching, your handlebars are too low. Instead, use your handlebar lever to raise the handlebars.
You might find that if your shoulders are slouching, it causes an ache in your upper back and neck. This is because too much pressure is being put onto your muscles here.
Similarly, raise your handlebars if your spine is hunched over when you’re riding.
Alternatively, you might feel like you’re very cramped when you’re using your Peloton Bike or Bike+. If this is the case, your handlebars are likely too high.
You want to feel like your spine has enough space to extend fully. If your handlebars are too high, you may feel you don’t have enough space.
Use your handlebar lever to lower the handlebars until you don’t feel cramped. You want your spine to be straight when you’re on your Peloton Bike or Bike+. This will help you get the most out of your rides.
Different riders prefer different handlebar height settings. It will be up to you to choose what you like.
The primary advice is to have a long, straight spine and not let your shoulder slouch.
Some riders also like to vary their handlebar height slightly between rides. This will help prevent too much pressure from being put on the same spot on your arms or back every time you use your Bike.
Space required for your Peloton Bike or Bike+
An essential factor to keep in mind when setting up your Peloton Bike or Bike+ is set up space. The Bike and Bike+ have different space requirements as they are different sizes.
Remember that whatever space you choose, it’s best to make sure it’s well-ventilated. For example, a poorly ventilated area containing an exercise bike will certainly not be pleasant.
Try to avoid squeezing your Peloton into a space smaller than recommended. This might lead to issues with adequately using the Bike, and you may have problems with riding especially if you don’t have the required head height.
Length required
The minimum length required for the Peloton Bike or Bike+ is 150 cm.
Width required
The minimum width required for the Peloton Bike or Bike+ is 60 cm.
Head height required
For either the Peloton Bike or Bike+, Peloton recommends having a ceiling height of at least 244 cm.
Otherwise, some riders might not have enough headroom when riding.
Having a low ceiling might lead to riders slouching more if they don’t have space on their Bike to ride correctly.
Peloton Bike (Bike+) set up troubleshooting.
You might encounter some common potential issues when you set your Peloton Bike up.
Electronic issues
If you’re having issues with the Peloton touchscreen or your Bike isn’t turning on, first check all the wires are plugged in.
Check your power cable is correctly plugged into the wall outlet and the back stabilizer of your Bike.
Check your monitor cables (located by the flywheel) are securely plugged into the back of your touchscreen.
If everything is plugged in correctly, try turning off the power by unplugging the Bike, leaving it for a minute or two, then plugging it back in.
If this doesn’t work, remember you can always call the Peloton service team to help you out with any problems.
Stabilizing your Peloton Bike or Bike+
One common issue Peloton Bike users find when setting up is that the Bike might wobble.
When you’ve chosen the perfect place with enough space for your Peloton, it might be that this place doesn’t even have ground.
Don’t worry because there are easy ways to stabilize your Peloton Bike or Bike+.
Crouch down to look at your Bike’s stabilizers. If any of them aren’t level with the ground, this might be the reason why your Bike is moving when you ride.
Twist down any of the feet until they rest firmly on the floor.
Tightening your Peloton Bike or Bike+ Seat
Some users have also found that their seat needs tightening when it first arrives. You might also find your seat gets loose over time, so it’s always worth giving it a tighten. You don’t want to be slipping around on your seat when you’re riding!
Your seat needs to be parallel with the floor. Stand at the back of your Bike and check if the saddle is parallel to the floor.
Get your socket wrench (which will come with your Peloton Bike) and squat down to see the bolts located on either side of your seat.
Use the socket wrench to tighten these bolts (turn it to the right to tighten the bolt). Hold onto the seat as you do this to help you get it tighter and also to help keep the seat in position.
Check your seat is tight by giving it a jiggle. Then, you should be ready to ride!